
Turn on suggestions
Auto-suggest helps you quickly narrow down your search results by suggesting possible matches as you type.
Showing results for
- The eBay Community
- Discussion Boards
- Buying & Selling
- Selling
- Re: How to take background off from listing pictur...
Options
- Subscribe to RSS Feed
- Mark Topic as New
- Mark Topic as Read
- Float this Topic for Current User
- Bookmark
- Subscribe
- Mute
- Printer Friendly Page
How to take background off from listing pictures with FhotoFiltre
Options
- Mark as New
- Bookmark
- Subscribe
- Mute
- Subscribe to RSS Feed
- Highlight
- Report Inappropriate Content
on 11-03-2012 08:00 PM
I was asked about how to take back ground off from listing pictures by a seller this morning. I decided to post a thread rather than doing this as a private message. It might help other sellers who don’t know how.
I use PhotoFiltre. It’s free to download.
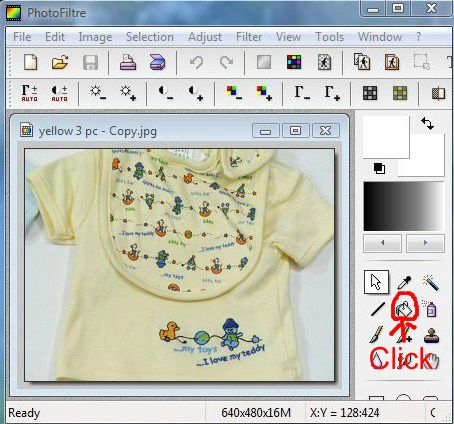
Step one: Open PhotoFiltre and drop a picture in. Then click “fill” icon.

Message 1 of 57
56 REPLIES 56
Re: How to take background off from listing pictures with FhotoFiltre
Options
- Mark as New
- Bookmark
- Subscribe
- Mute
- Subscribe to RSS Feed
- Highlight
- Report Inappropriate Content
on 11-03-2012 08:12 PM
And do touch up.
Message 11 of 57
Re: How to take background off from listing pictures with FhotoFiltre
Options
- Mark as New
- Bookmark
- Subscribe
- Mute
- Subscribe to RSS Feed
- Highlight
- Report Inappropriate Content
on 11-03-2012 08:14 PM
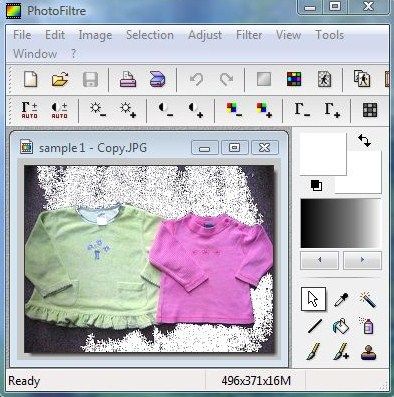
When you take photos intending to take background off, it’s better use a white or light colour plain sheet or paper underneath. If you use carpet underneath “fill” won’t work well.
Message 12 of 57
Re: How to take background off from listing pictures with FhotoFiltre
Options
- Mark as New
- Bookmark
- Subscribe
- Mute
- Subscribe to RSS Feed
- Highlight
- Report Inappropriate Content
on 11-03-2012 08:15 PM
You need to do manually with paint brush if this happens.
Message 13 of 57
Re: How to take background off from listing pictures with FhotoFiltre
Options
- Mark as New
- Bookmark
- Subscribe
- Mute
- Subscribe to RSS Feed
- Highlight
- Report Inappropriate Content
on 11-03-2012 08:17 PM
I just realised I got the spelling wrong in the title.
It's PhotoFiltre. Sorry.
I hope this thread helps.
Message 14 of 57
Re: How to take background off from listing pictures with FhotoFiltre
Options
- Mark as New
- Bookmark
- Subscribe
- Mute
- Subscribe to RSS Feed
- Highlight
- Report Inappropriate Content
on 11-03-2012 09:49 PM
Great tutorial 🙂 I use PhotoFlitre too, based on your recommendation and tips from ages ago.
Do you mind if I add in a few of the little hints and tricks I use?
Message 15 of 57
Re: How to take background off from listing pictures with FhotoFiltre
Options
- Mark as New
- Bookmark
- Subscribe
- Mute
- Subscribe to RSS Feed
- Highlight
- Report Inappropriate Content
on 11-03-2012 10:03 PM
Hints and tricks are welcome, digital*ghost 🙂
I posted a similar thread ages ago but I couldn't find it when I searched. I think it was deleted because it passed the time limit.
If we can add hints and tricks sometimes we can keep this alive for others 🙂
Message 16 of 57
Re: How to take background off from listing pictures with FhotoFiltre
Options
- Mark as New
- Bookmark
- Subscribe
- Mute
- Subscribe to RSS Feed
- Highlight
- Report Inappropriate Content
on 12-03-2012 12:39 AM
I'll have to leave out one (repeating tool) until I can find a suitable photo to demonstrate how I use it, but here's a couple -
When using the fill tool, adjust the tolerance to change how restricted it is (default setting is 30 - not the 100 as pictured).

The tolerance setting determines how much or how little the fill tool is restricted by varying colours and/or defined lines in the photo. For example, here's what happens on a wooden floorboard background when the tolerance is set to 5 (from one click)

Here's what happens when it's set to 100 (from one click)

There's a couple of small spots that will need a bit of a brush up, but it's a lot faster than doing it all by hand.
If there are similar colours in the object and the background, or there is not a clearly defined line between the background and object (such as a pre-drawn outline as previously illustrated), a high tolerance will probably not work as well as it fills in all similar colours.
Message 17 of 57
Re: How to take background off from listing pictures with FhotoFiltre
Options
- Mark as New
- Bookmark
- Subscribe
- Mute
- Subscribe to RSS Feed
- Highlight
- Report Inappropriate Content
on 12-03-2012 12:53 AM
The other tool you can use to quickly remove the background of simple shapes like a plate is the crop tool.
(NB Usually I'm able to select the circle shape from the menu, and adjust it so that it perfectly fits the object. It wouldn't let me do that on this photo for some reason, so I had to use the square shape. I sized the square by dragging the sides to the rim of the plate, then clicked the Ellipse shape so it looked like this - if you can see the fine, dotted line around the plate, that is).

After that, you just select Crop (right click on the photo).
The background will automatically be cut, and filled with the second colour choice. (There's two squares on the top right that show current colour choices - in the example below, white is colour 1, purple is colour 2).
This is what it looks like after a crop

The same method would work for any simple shape, so good for books, plates etc.
Message 18 of 57
Re: How to take background off from listing pictures with FhotoFiltre
Options
- Mark as New
- Bookmark
- Subscribe
- Mute
- Subscribe to RSS Feed
- Highlight
- Report Inappropriate Content
on 12-03-2012 12:58 AM
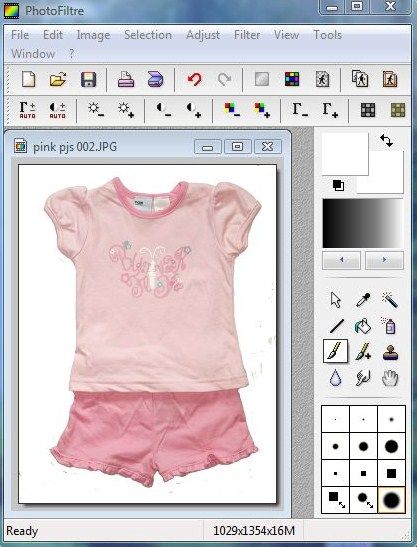
For objects with straight lines, I tend to use the line tool instead of outlining by hand. It's particularly handy for narrow gaps between clothing - eg the small trianular gap that tends to form between the body of a top and its sleeves. Also good for jeans. When I use it for clothes, I set the width to 1 - anything higher than that and diagonal lines tend to be very blocky. With 1, the line is a lot softer.
If the lines are perfectly straight (vertical or horizontal), then it doesn't matter as much, and you can set it for much wider.
Message 19 of 57
Re: How to take background off from listing pictures with FhotoFiltre
Options
- Mark as New
- Bookmark
- Subscribe
- Mute
- Subscribe to RSS Feed
- Highlight
- Report Inappropriate Content
on 12-03-2012 01:01 AM
I just use Paint. That allows me to crop pics and set the size. I don't have an interest in 'enhancing' them, so it works for me.
Message 20 of 57


